How to Draw a Rose With Pencil
You might have noticed that flowers are often used in logos, paintings, and tattoos. The Beauty of a flower has been praised for centuries! All flowers have beautiful and positive qualities, but roses stand out as the best. The rose is one of many flowers in the world that represent love. The Folks have embraced them with strong feelings and love. Their appearance and beauty captured our attention the most.
Here on this roundup post, you can learn how to draw a rose step by step using different methods.
Roses are iconic and have many meanings across cultures, making it difficult to represent in a drawing without knowing the meaning of that specific flower. We hope this post will help you to learn to draw a rose!
What colors do roses come in naturally?
It's important to color in your rose after drawing it. The colors of your flower are not limited by what you can choose, but if you want a natural effect, avoid certain tones. There are many different colors of roses, but the most common are white, red, and pink. Plant breeders have developed hues such as yellow, orange, purple, brown, and green that aren't present in wild roses.
Some Rose Drawing Pictures
-

Image by Ahire acadademy -

Colour Chameleon – Art by Sorja -

Mikio Mori at flickr.com -

artbyro.com -

sketch2paint @ flickr.com -

Marissa-kay @ flickr.com -

Rei-Draw-and-flowers-decorate -

Image by Rebecca Law -

craft-mart.com -

cherylelyse-flickr.com -

nikiysa-flickr.com -

SNB Tatto Art Studio -

Image by magnificent bastard -

Image by brandy bee acres -

-

Drawing supplies for drawing a rose:
- HB pencils or Black color marker (HB is the rating of the lead hardness. Most pencils sold in the store are HB.)
- A kneaded rubber eraser, or any type of eraser you choose.
- You need a pencil sharpener
- A white sheet of paper.
- You can use a regular color pencil or a water-based color marker.
- Photograph of a rose (if you prefer, you can see a real rose)
How to Draw a Rose Step by Step
Method 1: Rose Drawing Using Markers

Roses are the most popular flowers in the world. They come in all colors and shapes with different meanings behind them, from true love to death. Roses can be drawn in many ways, but we will teach you how to draw an easy rose for beginners. All you need is paper and a pencil, color!
We're going to draw and color a realistic rose so let's get started drawing a rose. Follow these steps below:
Step- 1: Create the rose shape

First, start by drawing a curve that looks like you were going to be drawing a vase. This is the round part of the rose. Let's do the same thing on the other side.
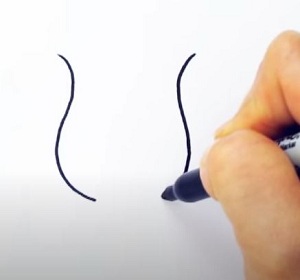
Try to draw the same shape on the other side; it doesn't have to be exactly. Just something similar, so it curves about right there to come in and start to round off and bring it end. So they look like a vase, right that's the shape that you're looking for.
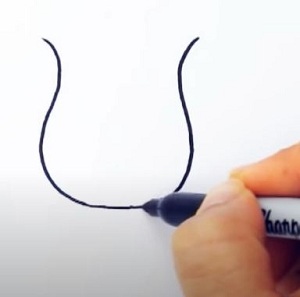
Then, you can bring the line in a little bit more to make it easier; connect it there.
Step- 2: Start to draw petals

So then, from there, let's come up to the pedal to draw the outside petal and curve it around and bring this huge curve all the way down—kind of towards the center, a little bit past the center.

So then bring this big curve down and bring it all the way around to about there, so that's one petal, and then finish this one together.
Step- 3: Draw more petals
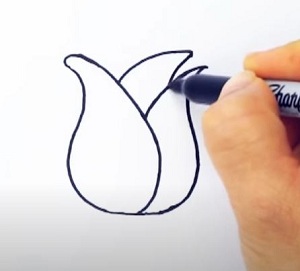
Okay, so now the next step is to come up, give yourself a point, and draw another petal. We don't want to go too high we want to come about just about the same height as the petal. So then bring it in, so that's another petal, and then finish off this one; just come on the edge and bring in the curve.

So now it looks like this is inside this right pretty cool just adding that line changes everything. Then from there, we're going to draw a curve to make it look like there's another petal right there.
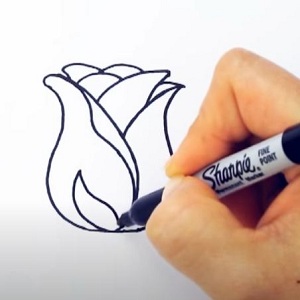
Step- 4: Add more details

Then one more kind of angle a little bit and then once more to fill it up, so maybe this one comes up a little bit and back and so then for some details on this pedal as some of the rose petals kind of fold over.
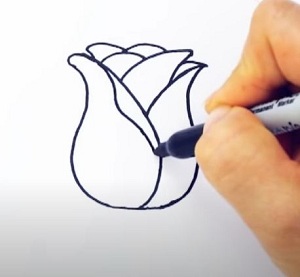
We're going to come right at the top and draw this curve, so come about the top, and we're going to little bit continuing towards this curve and bring it all the way down and taper it to the line so now it looks like it has this pedal that's folded over pretty cool.
Step- 5: Draw the stem with leaves
We've got the rows in, so let's draw the leaves that make it look like a rose. So we're going to draw a curve for those tiny leaves. Then come in the center, draw curved.

We're going to give it to about two more leaves. Just draw a curve down and bring everything back down to the center, so go up and bring it back in.
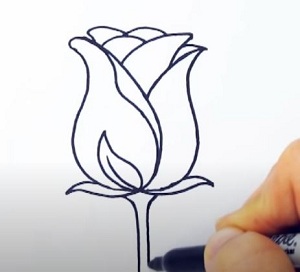
So same thing on the other side makes it a lot easier, curve down, go up and bring it back in. Now it's starting to look like a rose, right yeah, so then draw the stem. We will come about towards the center, draw two angled lines and bring it down nice and straight.
Step- 6: Color it nicely
Now it's starting to look like a rose. So, now go ahead and color this rose just using your basic water-based markers and color it.

You can go in with a color pen, just using a dark brown to pop it out a little bit more. Would you please give it some more dimension? You can add some more shadow with this color pencil.

So finally, your rose is all drawn and colored.
You don't have to be intimidated by drawing Roses anymore because this video tutorial below will make your drawing easier! Make a bouquet from this drawing for yourself and someone you love.
Method 2: Rose Drawing Easy With Pencil

It's a common misconception that you need to be skilled with a pencil to draw a rose. It is one of the more accessible flowers you can draw on paper! I'm going to show you an easy way to draw a rose with a pencil. You don't need any fancy materials, just some paper and a sharpened pencil. It's effortless! Just follow the step-by-step instructions below.
Step 1: Establish your guidelines.

Flower drawings may appear complex, but they are easy to create if you break each element into simple shapes and lines. Starting with the center of a circle, draw a swirled design. You will be starting your rose head from this point. Make five equal sections on the inside of the circle by drawing light lines from the center.
Step 2: Add the details

From here, First, make a line. Now draw the letter Y in the middle of it. Inside the letter Y, add lines and circles to create shapes that look like rose petals. Roses, like other flowers, are represented in drawings by lines and circles.
Step 3: Create the petals

Petals are the final touch to your rose drawings! Draw half-moon shapes on the centerline of the "Y" shape. Imagine half-moons as rose petals for a more natural look.
The half-moon shapes should overlap, and some should go over and under the lines of the other shapes. As soon as you are satisfied with where these shapes are placed, you can go over them with your pen to seal them.
Step 4: The finishing touch

Finish by drawing a teardrop shape and an oval shape with pointed tips; stretch them to the outer circle edge to make your outer petals larger and fuller. Imagine that there would be shade hitting your rose as it is sunny. Draw small lines there. This makes your rose drawing appear more realistic since it's no longer flat.
You can add shading to your rose to give it more depth.
Method 3: Drawing of Rose for Kids
Kids love drawing. Drawing a rose for kids can be an enjoyable experience. All you need is a pencil, paper, and some patience. You could draw a rose that is still blooming and have a few petals with an easy side view. Especially with these layered shapes, kids can spend more time on their leaves, adding details.
Gather all of the necessary supplies mentioned above and get started! We also recommend using clean hands or wiping them with soap and water before drawing so that the dirt doesn't transfer onto the paper.
Supplies You Need:
- A piece of drawing paper
- A black marker
- Drawing crayons
Follow these easy steps below to create a rose for kids:

Steps to Follow:

- Make a sketch of the large right petal.
- In the reverse order, add the left petal after the right.
- Create two more petals by drawing the tops.
- Below the petals, add the stem.
- The stem should start with the leaves on the left.
- Draw the leaves at each end.
- The stem should come first before the right leaves.
- Draw leaves at both ends.
- Using a marker, trace the outline then color it.
Rose Drawing Outline
Drawing and arts are built on the foundation of their outlines. Paintings can be mapped using an outline the same way an architect would use a blueprint. For centuries, artists have transferred drawings onto canvas using an outline.
Observation is an essential part of a drawing. It is also crucial that you learn to observe your subjects differently to improve your drawing skills.
Drawing what you see is as simple as that. There have been many talks that you draw what you see, but if we don't know what to see and how to see, this can be frustrating. So before beginning the drawing here, we gave you some rose drawing pictures that you can accept as an outline to draw a rose uniquely.

Final Words
The beauty of a rose is something that can be captured in these simple steps. With a bit of patience and practice, you will be able to draw this beautiful flower for your friends and family with ease. In this blog post, you've learned how to draw a rose step by step with straightforward drawing tips. You don't need any fancy materials or expensive tools for this tutorial! We hope that you enjoyed learning these easy techniques and found them helpful in your life.
How to Draw a Rose With Pencil
Source: https://www.tomostudio.com/how-to-draw-a-rose/
0 Response to "How to Draw a Rose With Pencil"
إرسال تعليق